| DarylS |
| (.700 member) |
| 15/01/10 02:48 AM |

|
|
|
The starters we use have either large rounded hickory knobs, or moose antler shanks. We like the moose antler as it's heavy and hard.
Hitting the bal with the knob of the shank with 1 blow, doesn't distort the ball but merely puts it down flush with the top surface of the muzzle.
Then, smacking the knob with the shaft of the starter resting on the ball puts it down the tube the length of the starter. Taylor uses a couple lighter smacks to put the ball down into the bore, as he's a bit more particular about pinching his fingers against the muzzle. My timing for getting my fingers out of the way might be a bit better, I guess.
If you whack, whack whack with a mallet on the ball to put it flush into the muzzle it will distort the ball, flattening the top surface considerably. Doing it with one smack does not, as it merely flattens the sprue a bit.
I also have a small knob on the starter's handle which I use in some guns as this method actually makes for a more accurate shot. The small brass plunger, which has a concave cup on the end, and sticks out of the starter's knob or handle about 1/4". This puts the ball and patch down into the muzzle that 1/4" and results in no damage to the top surface at all, due to the cup. To use, put the small brass knob on top of the ball, which is sitting on the patch. Give the back of the starter a whack with your palm and into the muzzle goes the ball and patch. It's a bit slower than a single whack with the starter and that's why we use the single whack a lot- especiall in larger bores. Smaller bores are more particular, accuracy wise, and benefit from a more gentle approach. The brass protrusions I use, are usually the but end of a ctg. case with the primer removed and the bottom cupped with a drill bit.
Perhaps you noticed in the video I put the starters, big knob on the rod to push the ball down, then smacked it at the bottom. The bottom smack is to set the ball on the powder with the same pressure each time. Practise doing this will teach you to use the same pressure each time. This is very important for accuracy. You can feel with the rod when the ball comes to rest on the powder. Then, I put just alight smack on the knob to 'compress' the powder slightly, for a more even burn. Taking velocity readings with doing this and not doing this will show improvements with the method I adopted. The starter's know has a hole drilled into one side to fit over the rod so the knob can be used as I showed.
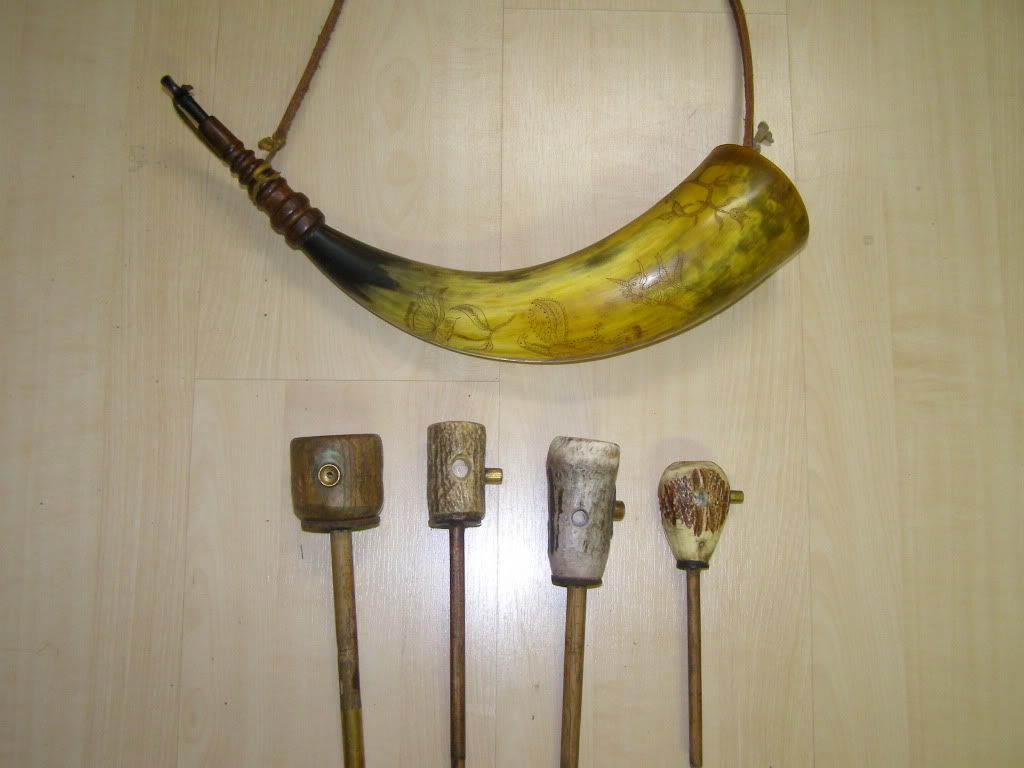
These are some of my starters showing the little stud. they are hickory, elk antler and moose antler. The leather washers protects the muzzle from the hard antler which will actually ding it when struck. I moved the big round wooden one to show the cupped stud. All of the studs are cupped to prevent damage to the ball. that wooden starter is the first I made for the 14 bore rifle - which means it's 24 years old and is a favorite. The largest Moose antler starter is becoming a favourite due to it's mass, although not much heavier than the wooden one.
The horn is a custom horn I purchased at Dixon's Gun Maker's Fair last July - also a favourite. It is very thin and holds 1 1/2 pounds of 2f - a large horn. The smallest starter is for the .32, while the second smallest is for the .40 and .45 using a 3/8" hickory shaft. The largest starters use 1/2" and 9/16" hickory shafts. It is important to have a brass collar on the end of the starter shaft to prevent splitting. In the very small calibres, a .22 hornet case, rim removed will work, whereas larger diameter cases are used for the larger shafts, of course.
