| Ron_Vella |
| (.333 member) |
| 15/01/07 02:25 AM |
|
|
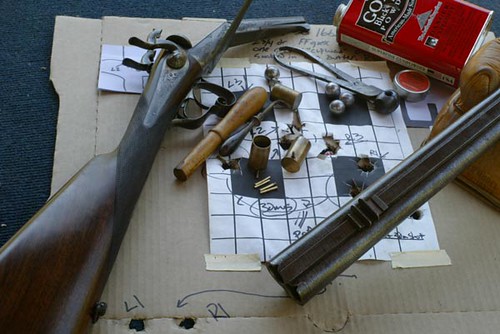
Last Sunday I finally had everything jigged up and ready to go. Fired up the torches and soldered everything together with Hi-Force. Spent each evening last week scraping and stoning all of the surplus solder away. Yesterday I set the gun up in my proofing cradle and put 3 "blue pills" down each barrel. No sign of any problems whatsoever. Then fired 3 rights and 3 lefts, off-hand, with the iron sights, at 25 yards. It was very cold and windy, not really conducive to careful shooting, but each barrel grouped into about 1 1/2", about 6" apart, and on exactly the same vertical plane. Should be a snap now to pull the wedge forward, allowing the muzzles to converge more, and bring the barrel groups together. Another grain of powder, and an additional 50 fps should help with convergence as well. After about 1000 hours of labour, and about $3000 invested in this project, I feel as if I won the lottery yesterday !!! Also, the gun is an absolute pussycat to shoot. 500 grain Hornadys, at 2100 fps, were as comfortable as can be to shoot.
| sakmyk |
| (.224 member) |
| 15/01/07 05:50 AM |
|
|
Hi Ron,
nice to see you here.
We've discussed many, many years ago, back in those days when the Internet was young...

You had then just completed your 12gauge for which you used Hastings rifled blanks. I recall it shot Lightfields... After that I ordered some tubes from Hastings for my friend, and got one 12gauge single barrel made for me.
You sent me also a letter and some copies on A. Gray's book - Bought the book soon after that, and I still have the letter, too. Actually, I read the letter just a couple of weeks ago as I tried to get my documents on DR's in order -- Still a terrible mess, though...
Congratulations on your current achievements.
Please post some photos!
Regards,
Saku
| tinker |
| (.416 member) |
| 15/01/07 07:46 AM |
|
|
|
Good for you Ron!
Show us some photos of your rifle.
--Tinker
| 500grains |
| (.416 member) |
| 15/01/07 12:08 PM |

|
|
|
Quote:
After about 1000 hours of labour,
Holy batwings!! That is a daunting project. They figure about that much time to make a best quality English gun, plus engraving on top of that.
When you say 'blue pills' do you mean Barnes solids?
Any chance of pics?
Thanks for the report!
| Ron_Vella |
| (.333 member) |
| 15/01/07 12:31 PM |
|
|
Saku, Good to hear from you again. You have a good memory, that 12 gauge rifle was my first double project and is still my sweetheart. I've taken 8 whitetails with it so far and those Lightfields are stunning killers. I do have a bunch of pics of this project but no idea how to post them here. I'll have to get my son-in-law, the computer wizard, to come over here and do that for me.
400,
Yes it's a lot of hours but also a labour of love. By "blue pills" I mean some very hot proof loads which I made up. I'm using the old style, now discontinued, Hornady 500 grain softs and solids. I bought up several lifetimes worth of them on e-bay.
| mickey |
| (.416 member) |
| 15/01/07 07:15 PM |

|
|
|
Ron
If you can email them to NitroX he can post the pictures for you.
Photos AT NitroExpress.com
Any explanation can be sent or added later.
(Ugg! I was wondering why I was receiving so much SPAM at that email address and see now it was posted in the proper form on open forums!!! (now changed) Note someone needs to be PM or email my normal address that photos are being sent! As I don't check it unless I need to. NitroX)
CptCurl
|
| (.450 member) |
| 15/01/07 11:50 PM |

|
|
|
We will anxiously await photos of this project. Maybe a narrative to go along?
Very interesting.
Curl
| sakmyk |
| (.224 member) |
| 16/01/07 10:50 AM |
|
|
Ron,
sounds like your 12 bore slug double does exacly what it is supposed to. I also shot a whitetail earlier tonight. Not much worth mentioning in that... just harvesting some meat for the family. It was a button buck standing in 25 meters, and I shot it from a hide. Well, actually, there were two notable things.
For the first time I used my suppressed .45-70 singleshot with subsonic ammo (520gr RN cast lead bullet, 315 m/s or 1033 fps). It was the cleanest hole through a deer that I have ever seen. Clear lungshot and the buck ran some 70 meters.
Blood in the first tracks told me that it's not far, so I fetched our young terrier from the house and we "tracked" those few tens of meters. The bitch was SOOOOO proud as she found her first deer
What action did you use on building this .450 #2 double?
Regards,
Saku
| Ron_Vella |
| (.333 member) |
| 16/01/07 12:19 PM |
|
|
Saku,
I started with 2 BRNO ZP-49's because I wanted to end up with one gun with a set of rifle and a set of shotgun barrels fitted to the same action.
| Marrakai |
| (.416 member) |
| 17/01/07 01:01 AM |

|
|
|
Two-in-one SxS doubles on shotgun actions...
Man, that's dedication!
Welcome back, Ron. Hope you brought the photo-album!
| Ron_Vella |
| (.333 member) |
| 17/01/07 01:54 AM |
|
|
Hi Tony,
Thanks for the welcome. I'd also like to thank you for preaching often about not making the barrels too heavy lest you lose that "between the hands balance and quickness" that a double rifle should have. I thought long and hard about that and since my other projects ended up more muzzle heavy than I would have liked, I turned these barrels MUCH smaller in diameter than instinct told me to do. Rather than .750" at the muzzles, they are .670". The result is that this gun feels ALIVE in the hands. Unloaded, no sling, and no scope, it weighs 9 lbs 11 1/2 oz, but it is a joy to shoot. Good on ya mate!
| tinker |
| (.416 member) |
| 17/01/07 03:31 AM |
|
|
|
|
Now I know why you were digging around everywhere for 450no2 barrel contours.
Did this end up being a straight-out profile copy of another rifle's tubes?
--Tinker
| sakmyk |
| (.224 member) |
| 17/01/07 03:33 AM |
|
|
Ron,
good to hear that ZP-49 works in these conversions. I've always been attracted by its smooth but still somewhat barren looks. At least those guns imported here in Finland are almost always without any engraving or other decoration.
I truly enjoy all fancy doubles, but for some strange reason I've always been fascinated by dominion grade Holland & Hollands and other PH grade doubles... Tools for professionals, literally.
I've many times thought about purchasing a ZP-49 for my future projects. Second hand BRNOs are all the time available here and they're also fairly cheap. However, I have hesitated since my friend has one, and he managed to shoot it loose within a few years. Almost all of his shooting was on game - he shot clays only occasionally. He also exclusively used regular loads and not any kind of semi- or mini-magnums. One local "gunsmith" then hammered the bites tight again. I was pissed with that kind of work, but hey, it's cheap & fast.
It was definitely less than thousand rounds that put the gun into that condition. I've thought it a lot, and I reckon there was something wrong in that individual gun.
Regarding pics on your double, I'll echo those guys above.
Regards,
Saku
| Ron_Vella |
| (.333 member) |
| 17/01/07 03:58 AM |
|
|
Saku,
I agree, the gun has the looks of what Americans insist on calling "Funeral Model Purdeys", although Purdey never made any such model. That stark black receiver looks much more fitting as a heavy rifle than using a shotgun action that is engraved with pointing dogs and birds! I own 3 BRNO's, have shot them a lot and see no sign of looseness whatsoever.
| Ron_Vella |
| (.333 member) |
| 06/02/07 03:19 AM |
|
|
As info, and so that some do not think that I reneged on a promise, I have tried several times over the last two weeks to e-mail my photos of this project to Nitrox. However, each time that I try, I get a message saying that the file is undeliverable because Nitrox's mailbox is full. I'm far from being a computer wizard and don't know what else to try.
| stoerte |
| (.224 member) |
| 06/02/07 04:51 AM |

|
|
|
Ron,
The easiest way to post photos would be to create an account(free) on a website that stores photos on the net, eg http://www.twango.com/
Now, step by step: (instructions for twango.com, but others work similar)
1. you have to be logged on
2. upload your media: click the upload tab left of the search field
3. select your photos you want to upload, 5 at a time
4. when you finished uploading go to home > my media, you will see your photos there
5. click on the first one, click on it again
6. copy the image adress, referred to as permalink in the grey area under the back arrow
7. paste the link into your message like this [image]completelink[/image] ( replace "completelink" with the copied adress)
8. repeat step 5-7 for each image
Hope this helps,
I am dying to see the photos!
Stoerte
| Double_Trouble |
| (.375 member) |
| 06/02/07 05:12 AM |
|
|
Ron:
chances are that you are sending too much at once to Nitrox's address.
I am far from a computer guru, but you may want to try splitting up the message you are trying to send into 2 or 3 different and seperate messages.
just a thought from an electronically challenged fellow member.
DT
| mickey |
| (.416 member) |
| 06/02/07 05:15 AM |
|
|
|
|
Ron
Are you sending them here?
Photos AT NitroExpress.com
A photo hosting is best but this should get them to John.
(See above comment regarding email address!
PS Had no idea the photos were being sent.
NitroX
| Ron_Vella |
| (.333 member) |
| 06/02/07 05:22 AM |
|
|
Yes, that's the address that I've been using, Mick. I'll try one more time when I get home tonight.
| banzaibird |
| (.333 member) |
| 10/02/07 12:07 AM |

|
|
|
Posting Pics for Ron.

1) My workshop, AKA the "Sanctum Sanctorum"

2) Rifle barrels, screwed and soldered into the monoblock. Top rib and sights set in place.
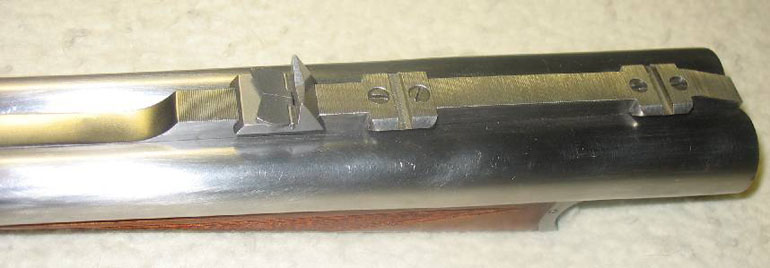
3) Close-up view of quarter rib with Weaver bases screwed and welded into place. Rear sight is a NECG from Brownell's, and has been rough-filed for elevation.
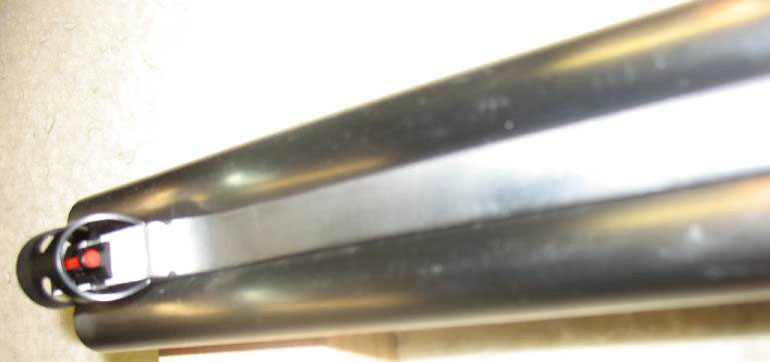
4) Hi-Viz front sight and NECG window hood from Brownells. Top rib is from Crown Press but I have modified it a great deal.
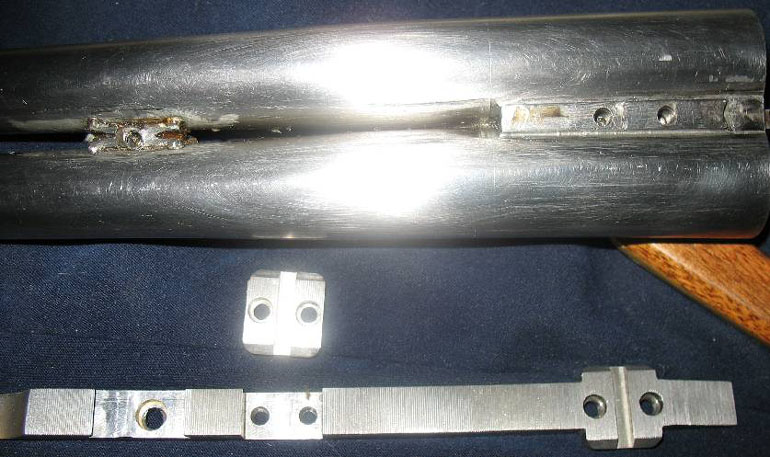
5) You can just make out the seam here between the rifle barrels and the monoblock.

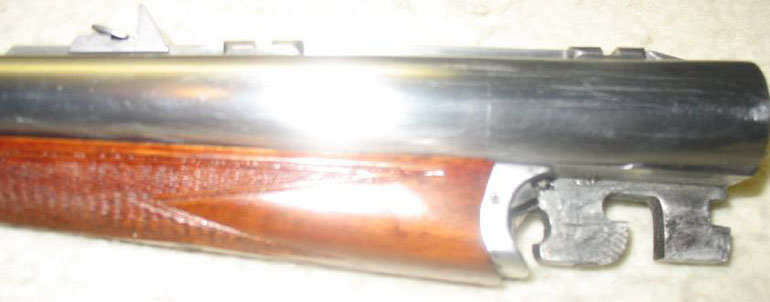
6) Bottom view of rifle barrels with bottom rib from Crown Press screwed into place and sling swivel base installed. I like to screw the ribs into the barrel spacers, as well as soldering them. This takes some of the load off of the solder joints when you're carrying a heavy rifle on a sling. It also ensures that the rib is not going to let go and leave you stranded in the middle of Africa.
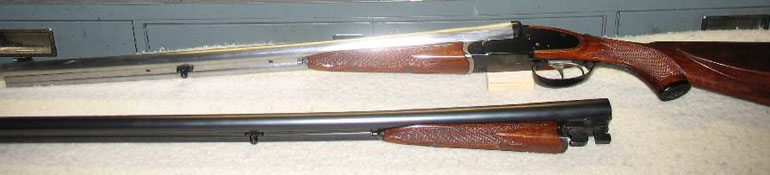
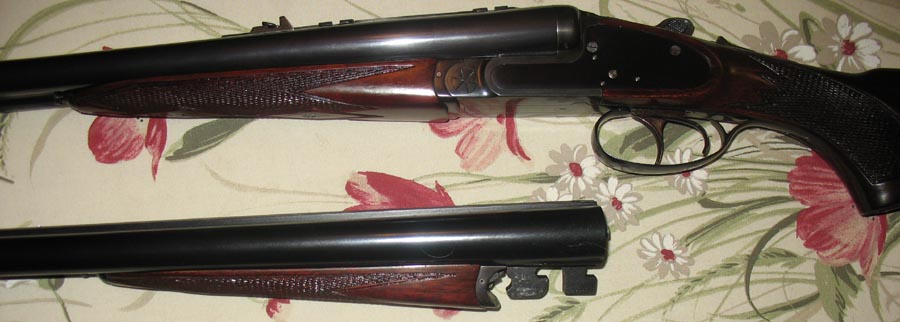
7) The rifle barrels on the action with the fitted shotgun barrels below. Note that both sets of barrels have their own forearm assembly and all pieces are now serial-numbered alike.
8) A second view of the same.

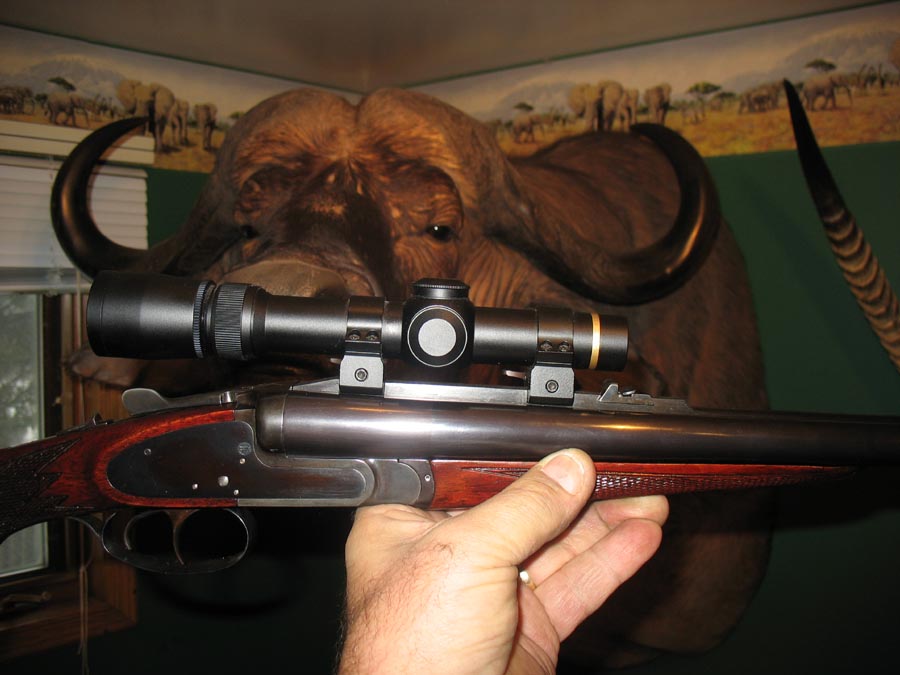
9) Close-up view of Leupold Vari-X III, 1.5x-5x, clamped onto Weawer bases with Leupold QRW rings.
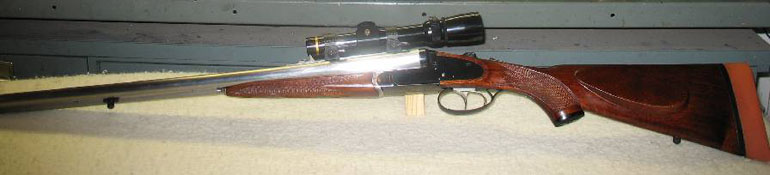
10) Over-all view of the same.
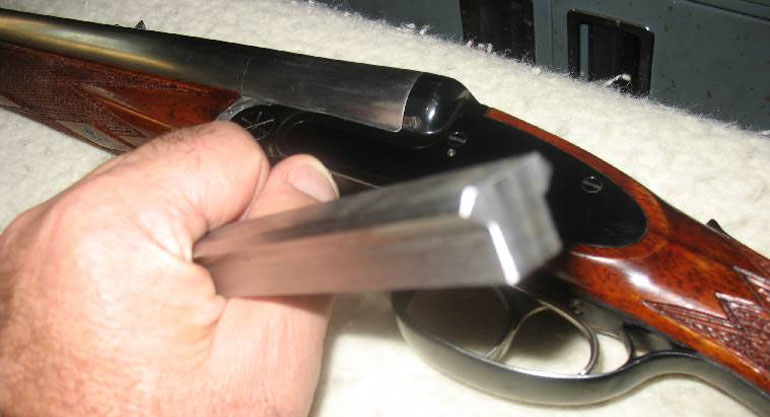
11) Looking down the iron sights.
12) This is the steel Weaver base stock from Brownells that I welded on to the rear of the top rib from Crown Press and milled as seen in photos.

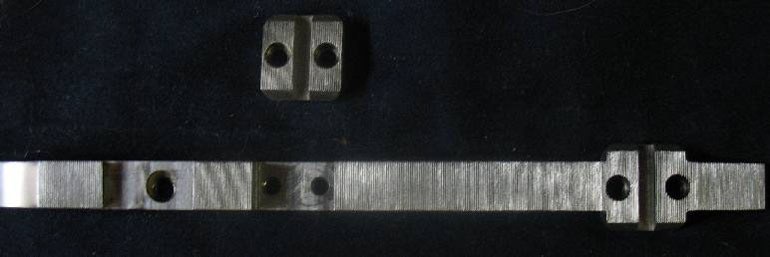
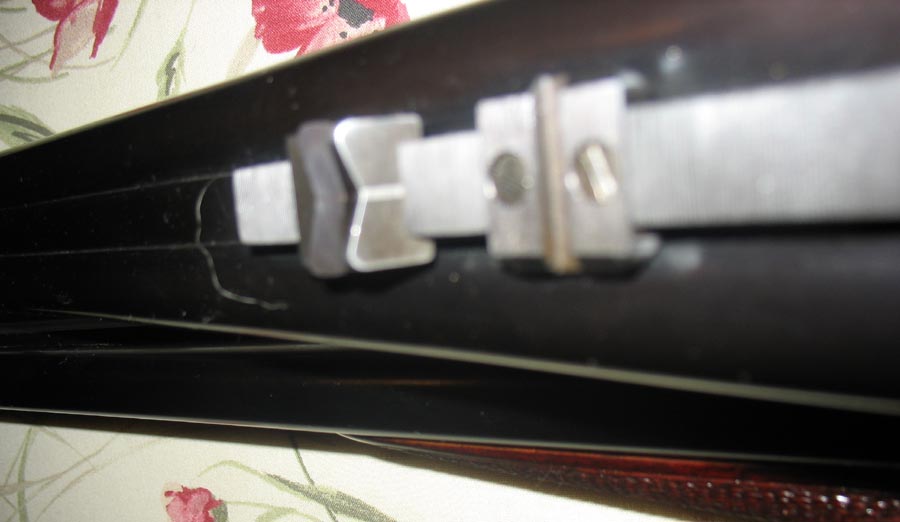
13) View of barrels, spacers TIG-welded into position, muzzle wedge in place, and both ribs lying below.
14) Quarter rib with the front QD base removed from its mortise. I matted the quarter rib and the front ramp with a 50 LPI checkering file,

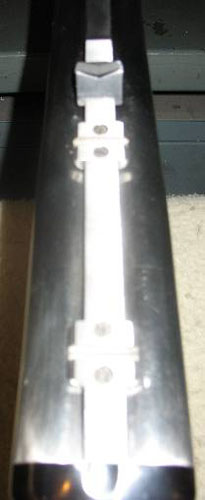
15, 16, & 17) close-up views of barrel spacers, welded into place.
15, 16, & 17) close-up views of barrel spacers, welded into place.

15, 16, & 17) close-up views of barrel spacers, welded into place.
| Ron_Vella |
| (.333 member) |
| 10/02/07 02:42 AM |
|
|
Post deleted by ronvella
| banzaibird |
| (.333 member) |
| 10/02/07 03:18 AM |
|
|
|
|
Ron,
No problem on the pics.
Now I have a couple of questions. Are all the spacers all the way out to the muzzels welded? What technique did you use to weld them? Was it a specialty TIG weld? What happens if/when the barrels wear a bit from shooting and the rifle needs a regulation tweak? If the welding on the barrel doesn't concern you did you give any thought to welding the seam lines at the monoblock?
Also if you could explain why you chose the swivel gets screwed to the rib instead of making a barrel spacer swivel out of the same piece? Also if you could give the overall impression of the one piece rib you used? How much work was needed to fit your barrel profiles? Do you do anything to hide the screws in the ribs after soldering?
Please don't take this as you did anything wrong. I'm just asking questions for my own benefit. The more I see the way others do things the more it makes me examine how I do mine. That's why I asked for the reasoning behind what you did.
Overall looks great, thanks for the pics. Best thing is now you have another action to build another set of barrels for from scratch
 .
. Bill
P.S.- The Weaver base also makes a decent quarter rib. Just keep the fins on the areas you want to use for the scope mounts than machine the rest off that it's the same width as the lower rib. Then machine the bottom of that to match your barrel contours. It gives a very sturdy one piece quarter rib.
| Ron_Vella |
| (.333 member) |
| 10/02/07 03:40 AM |
|
|
Bill,
I have a local guy who does Micro-TIG, very delicate welding under magnification. If the rear spacers are welded you don't have to worry about them moving during the solder job. The wedge between the muzzles is just soldered with Hi-Force so the regulation can be tweaked at any time. I silver soldered a reinforcing bar to the backside of the bottom rib to accept the swivel mounting screws. A lot of smoking, filing and stoning to fit the top rib, it's never an easy job. And you're right, you can make a pretty nice quarter rib out of that Weaver stock by milling away all of the stuff that you don't need.
| Bramble |
| (.375 member) |
| 10/02/07 12:58 PM |
|
|
Nice work!!
And your workshop is a hell of a sight tidier than mine.
Regards
| 4seventy |
| (Sponsor) |
| 10/02/07 11:24 PM |
|
|
Ron and Bramble,
Well done both of you!
A lot of work put into your double rifles for sure!
Ron, I like that one piece top rib, it looks neat!

| Ron_Vella |
| (.333 member) |
| 11/02/07 08:37 AM |
|
|
Thank you all for the kind words. It's nice to be able to share the end result of so much blood, sweat, and tears with folks who understand and appreciate.
| Chasseur |
| (.375 member) |
| 13/02/07 06:36 AM |

|
|
|
Ron,
Thanks for the story and all the pictures! I'm impressed!
| Ron_Vella |
| (.333 member) |
| 28/12/08 12:58 AM |
|
|
I'm bringing this back to the front of the queue in hopes that Roscoe can open the photos which are now designated as red "x"'s. I will try to take some photos of the completed gun today and forward them to him for posting. My digital camera is not focusing very well in close-uos for some reason but I'll see what I can do.
|
CptCurl
|
| (.450 member) |
| 28/12/08 01:42 AM |
|
|
|
|
Ron, I can't do anything with the "red X's" Those photos are gone off the other guy's server, or something. If you still have the photos that you sent him for posting you can send them to me and I can load them to the NE.com server and fix them.
Curl
| Sarg |
| (.400 member) |
| 28/12/08 08:33 PM |
|
|
Ron try the Micro setting on you camera , I think I have a few of the photos if you have lost them !
| Ron_Vella |
| (.333 member) |
| 29/12/08 12:41 AM |
|
|
Sarg,
In fact, I HAVE lost them. My internet server went to a different set-up for photo storage about 6 months ago. When they did that, I lost everything that I had saved.
Ron.
| Sarg |
| (.400 member) |
| 29/12/08 08:56 AM |
|
|
I will have a dig around in my computer and find them !
|
CptCurl
|
| (.450 member) |
| 29/12/08 01:20 PM |
|
|
|
|
Quote:
Posting Pics for Ron.
1) My workshop, AKA the "Sanctum Sanctorum"
2) Rifle barrels, screwed and soldered into the monoblock. Top rib and sights set in place.
3) Close-up view of quarter rib with Weaver bases screwed and welded into place. Rear sight is a NECG from Brownell's, and has been rough-filed for elevation.
4) Hi-Viz front sight and NECG window hood from Brownells. Top rib is from Crown Press but I have modified it a great deal.
5) You can just make out the seam here between the rifle barrels and the monoblock.
6) Bottom view of rifle barrels with bottom rib from Crown Press screwed into place and sling swivel base installed. I like to screw the ribs into the barrel spacers, as well as soldering them. This takes some of the load off of the solder joints when you're carrying a heavy rifle on a sling. It also ensures that the rib is not going to let go and leave you stranded in the middle of Africa.
7) The rifle barrels on the action with the fitted shotgun barrels below. Note that both sets of barrels have their own forearm assembly and all pieces are now serial-numbered alike.
8) A second view of the same.
9) Close-up view of Leupold Vari-X III, 1.5x-5x, clamped onto Weawer bases with Leupold QRW rings.
10) Over-all view of the same.
11) Looking down the iron sights.
12) This is the steel Weaver base stock from Brownells that I welded on to the rear of the top rib from Crown Press and milled as seen in photos.
13) View of barrels, spacers TIG-welded into position, muzzle wedge in place, and both ribs lying below.
14) Quarter rib with the front QD base removed from its mortise. I matted the quarter rib and the front ramp with a 50 LPI checkering file,
15, 16, & 17) close-up views of barrel spacers, welded into place.
15, 16, & 17) close-up views of barrel spacers, welded into place.
15, 16, & 17) close-up views of barrel spacers, welded into place.
Ron and Sarg,
That got most of them. If you can find the others represented by the dreaded "Red x" let me know.
Glad I could help out.
Curl
| Robgunbuilder |
| (.275 member) |
| 30/12/08 05:00 AM |
|
|
Ronvella- What nice work! You have done yoursel proud! Congrats and thanks for sharing with us!-Rob
|
CptCurl
|
| (.450 member) |
| 30/12/08 11:31 AM |
|
|
|
|
More photos from Ronvella:

| Ron_Vella |
| (.333 member) |
| 30/12/08 01:50 PM |
|
|
Many thanks to CaptCurl for posting these photos for me. Here's a brief explanation of them. Roscoe, feel free to move these under each photo if you like.
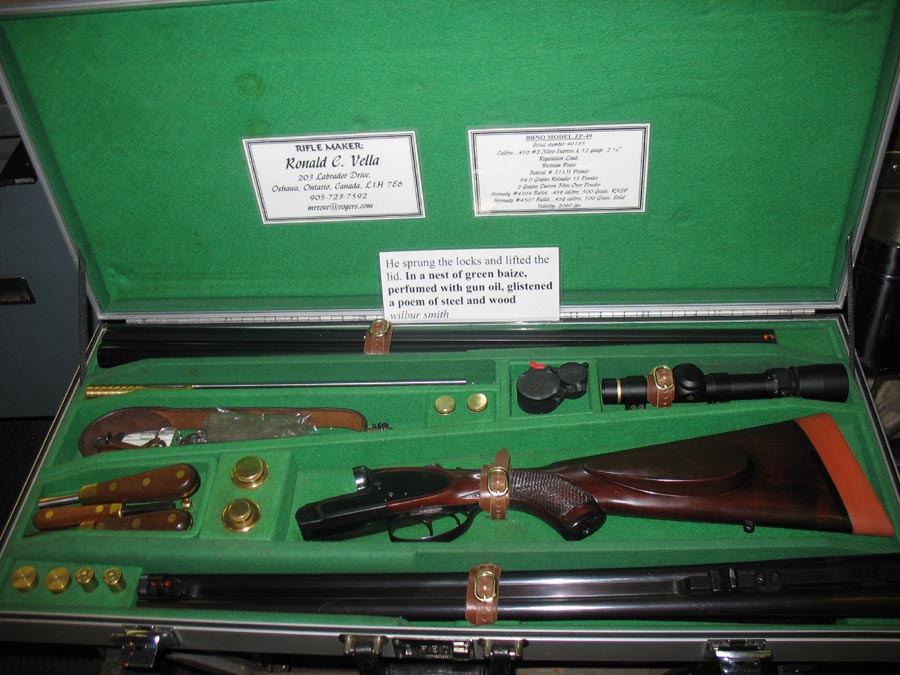
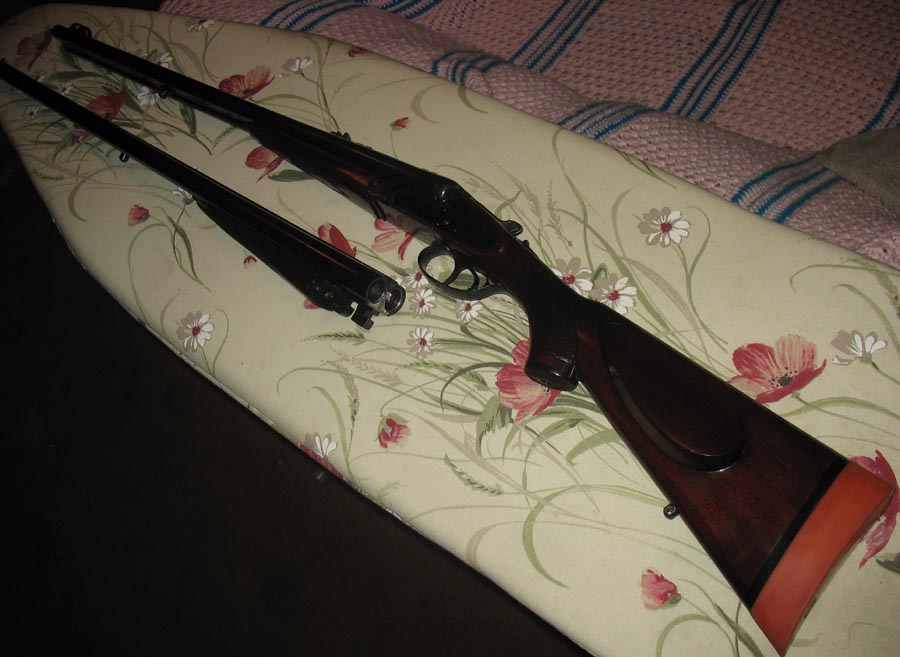
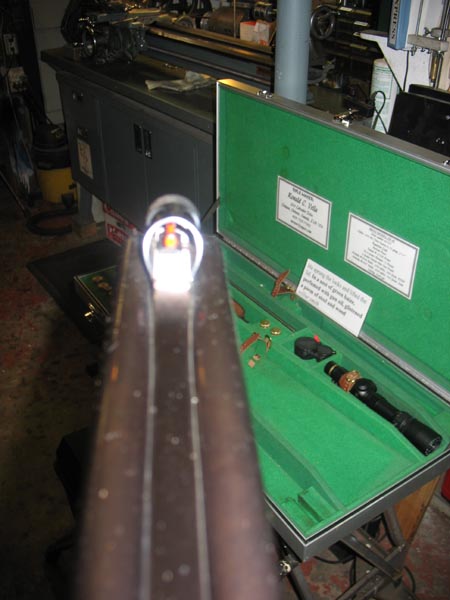
#1: The completed gun in its fitted case with all of the accessories. I turned the snap caps, oil bottle, vaseline bottle, spare firing pin cannister, and spare front sight insert cannister on my lathe, from brass. I also made the firing pin bushing wrench, chamber brush, and interchangeable-bit screwdriver, from walnut, steel, and brass. There is a hidden compartment under the Butler Creek scope caps which holds a supply of bore patches. There is another hidden compartment under the tools which holds all of the bore brushes, jags, screwdriver bits, etc.
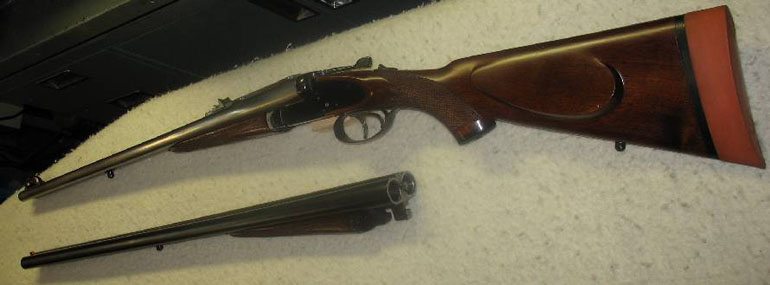
#2 & 3: Rifle barrels assembled to the action with the shotgun barrels below.
#4: Quarter rib and rear sight. For some reason, the flash on my camera washes out the colour and makes these polished, deep blue surfaces look silver. I went to a local jeweller and bought a piece of 1.5mm diameter platinum wire from him. I used one of my screw-slitting files to cut, then undercut the vertical line in the express sight. I then used a hammer and a brass drift to tap the platinum wire down into that slot, then dressed it all off, polished it, and blued it. The Brits had this platinum insert thing 100% right. There is something about the stuff that just grabs your eye, regardless of lighting conditions.
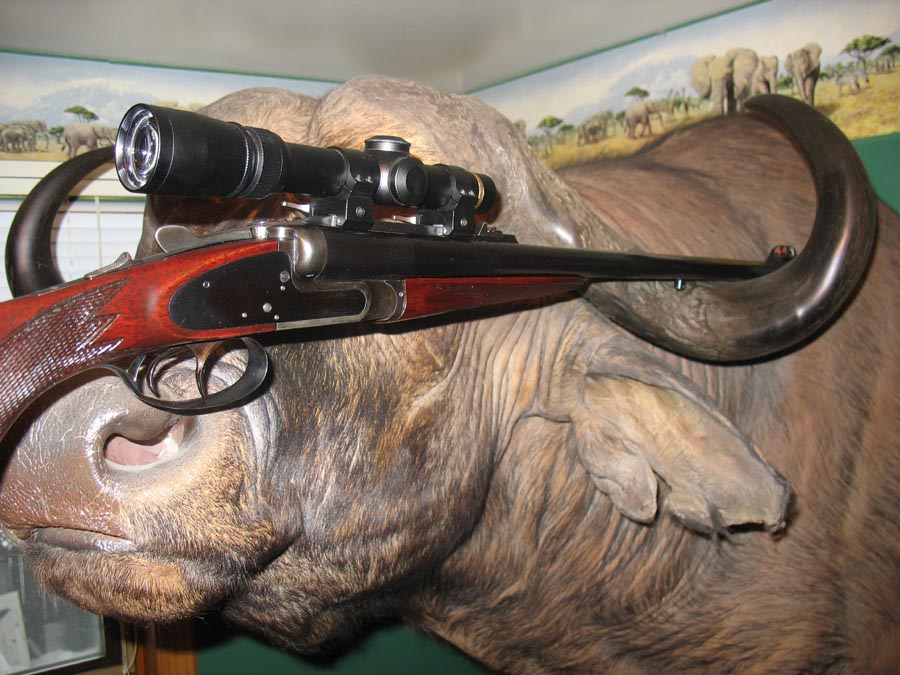
#5 & 6: Here's the gun in front of what I built it to do. I took this Cape Buffalo in Zambia with a .458 bolt gun that I built about twenty years ago. Now I aim to go back and take a second one with the .450 #2 NE that I'm holding.
#7: Self-explanatory.
#8: View of the Hi-Viz front sight. This, combined with the platinum insert in the rear express, is a great combo. Everone who has handled this rifle, comments first on how much they love the sights.
| Sarg |
| (.400 member) |
| 09/01/09 10:05 PM |
|
|
Now Ron , don't you need a Big Water Buffalo or Bantang to go with that Cape Buff ? ?
| Ron_Vella |
| (.333 member) |
| 10/01/09 06:44 AM |
|
|
Sarg,
We get a TV channel here called WILD-TV which features 24-hour a day hunting and fishing shows. A few days ago, I watched Jim Shockey's son, Branlin, take a HUGE water buffalo, head-on, at FOUR YARDS, while hunting with HuntAustralia. Got my blood boiling and got me to thinking about a matched set.
| Sarg |
| (.400 member) |
| 10/01/09 07:57 AM |
|
|
Ron ,
The Water Buff are a fair bit bigger in body & horn so may over shadow even a very nice Cape Buff
& if you like we can muck up the hunt and get you Tossed for story value ! ( of cause it may not be your story any more ,LOL) Yes that hunt was with one of the Outfits I work for .
So just throw a couple 577BPE barrels on a English Wild fowler shotty & we are off .
Keep it in mind if you do want a go .
Many years ago one of our Hunters was gored by a Bantang (only a small non fatal wound) when the outffiter saw his daughter at SCI and asked how he was she said it was the greatest thing to happen to him , soon after he saw the guy with his shirt up showing off his scars !
The whole thing had rejuvenated her father!
| Birdhunter50 |
| (.375 member) |
| 13/01/09 12:27 AM |
|
|
Ron,
Very Nice! I am impressed with your rifle and your dedication to doing the very best you can on this gun. It turned out to be a great example of the gunmakers art. I am also very interested in some of your methods and techniques and I'm sending you a P.M. about them. Thanks for sharing this great rifle project with all of us. Bob H.
|
NitroX
|
| (.700 member) |
| 23/12/15 05:35 PM |
|
|
|
BTTT for one member.